

Everything You Need to Know About Date in JavaScript
Jul 05, 2019

Welcome to the final post in our series about Building real APIs with NodeJS. It takes me 2 days at my weekends to research and implement to come up with this post. We’ll dockerize (it means we set up Docker in our project) our application that supports multiple environments: dev, test, production, etc… However, the first question is …
Yup, maybe you can hear people outside talking about we don’t need Docker for a small project, it’s complicated and waste time to do that.
Well, I admit that Docker is complicated for setting up, however, that’s because we don’t get familiar with Docker. For me, Docker was a thing that’s complicated in the beginning, so I scared to start working with that. I believe that when we finish dockerize successfully for our project and understand exactly what we’re doing, so it’ll not a problem anymore.
Docker can help our application can work well in different environments, from our development machine to production server. Do you remember that when we were students and we completed our subject’s project perfectly in our local machine but it couldn’t work when we deployed to server? Sound familiar, right? One more benefit, our new teammate can start working on project quickly when we have docker. Once upon a time, when I worked distributed system project at Viettel company software, that’s a big company in Vietnam, it took us half or even one day to help a new member to set up our system and run the website successfully. If we thought about Docker in the beginning in every project, we can save a ton of time. That’s why I want to investigate and apply Docker fluently everytime I start a new project.
For everyone is new to docker, I strongly recommend this article. It has nothing about code but the architecture of Docker in our system.
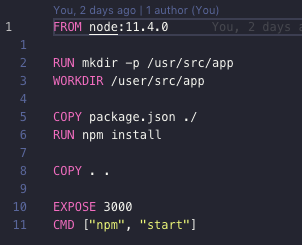
First of all, we create a Dockerfile in our root project:
Technically, Docker has 2 main concepts: image and container. Image is a structure, you can imagine it likes a .ZIP file. Container is an execution process, you can imagine it likes we unzip .ZIP file and using software.
Dockerfile contains construction to build image for our project. In the beginning, I’ll explain every single command in our Dockerfile:
FROM node:11.4.0 we’ll base on node image with version 11.4.0. It contains everything for a Node project as our project.RUN mkdir -p /usr/src/app we create a folder name /usr/src/app inside our docker environment to contain all our source code later.WORKDIR /usr/src/app we’ll indicate that our working directory now is /usr/src/app so later on when we run any command, it’ll run inside that folder.COPY package.json ./ we want to copy our package.json file in our current project to current folder ./ inside docker.RUN npm install we request docker to run command npm install to install all our necessary packages.COPY . . after install packages successfully, we copy all our source code in to current folder . inside docker.EXPOSE 3000 our Node application will listen on Port 3000. Remember that this port is inside docker environment, we need to publish to our host machine port later.CMD ["npm", "start"] one Dockerfile has only one CMD. This command will run last inside our container after everything above sets up successfully.First, we’ll build a new image name time-log-project based on Dockerfile we defined above.
$ docker build . -t time-log-projectFrom that image, we can start a container to run our service:
$ docker run -e PORT=3000 -p 8000:3000 --rm --name time-log-container time-log-projectWhen we start a container, we can pass environment variables as PORT in our command. That PORT variable can be called in our app.js when we start our server such as:
const port = process.env.PORT || 8000;
server.listen(port, 'localhost');
-p 8000:3000 means that we want to publish port 3000 inside docker container to port 8000 in our host machine. So that we can access this server through browser or postman in our machine at address localhost:8000.
In case you forget, please take a look old post in this series how to start our database with docker.
$ docker run --rm --name=my-mysql --env MYSQL_ROOT_PASSWORD=password --detach --publish 3306:3306 mysql:5.7.24Now when you list all containers in our system, we’ll see 2 containers name: my-mysql and time-log-container. At this point, we can use our application as normal. Congratulations!
As a real application, we usually work with multiple environments: development, test or production. Each environment requires different values, for example, the database for development and for test environment should be different. To manage environment variables efficiently, we can use config package.
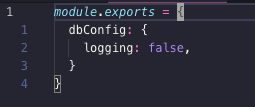
$ npm install --save configYou can take a look more details about how to use config package here. It’s quite simple. We need to create default.js file inside our /config folder. The default file contains all default values for our environment variables. If we want to different environment variables value for different environment, for example test environment, we’ll create one file such as test.js
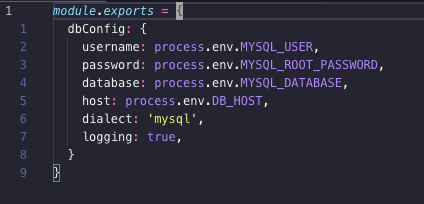
Our dbConfig values will get from environment when we run our application.
Now we’ll create files to store our environment variables values for multiple environments. In our project, we’ll split into two main environments: the default environment that can be used for development and production (later if we deploy to server) and the test environment.
.env file contains values for our default environments.env-test file contains values for our test environments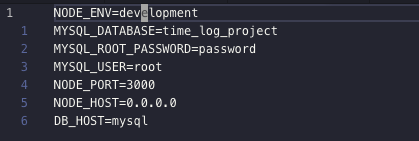
Both files should be in our root project folder, and of course, we should add them to .gitignore file because we don’t want to expose our secret information to the world.
# dotenv environment variables file
.env
.env-testBecause we use config so we don’t need file /config/config.json anymore. However, we need to re-configure sequelize to receive new configuration path.
First, we create new file in our root project .sequelizerc
const path = require('path');
module.exports = {
  config: path.resolve('.sequelizeconfig.js'),
  'migrations-path': path.resolve('migrations'),
};
It points to a new file .sequelizeconfig.js in our root project as well
const config = require('config');
module.exports = {
  [process.env.NODE_ENV || 'development']: config.dbConfig,
};Ok, we already have Dockerfile and now we’ll work with docker-compose… Be brave my friends, if you want to understand what’s different between them I recommend to this answer. However, I can explain shortly for you in our project context right now. In the beginning, we need Dockerfile to build our node application image. And then we have start 2 containers manually: one for mysql container and one for our node application container. Now we need a place or a thing can help us to compose our required services if needed. For example, we just want to start our node application service, if it requires a database, so please start it for us. That’s the job for docker-compose to show off.
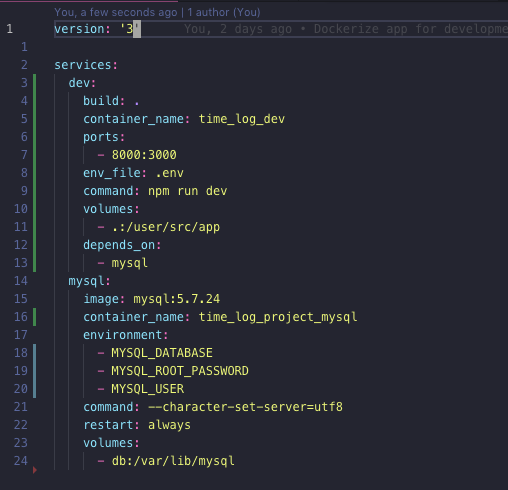
version the version of docker-compose, the latest is 3.services we’ll define all services that our application require to run.build default docker-compose will find Dockerfile to build image.container_name we want to specify a name for this container instead of a generated name from docker-compose.ports we want to publish port 3000 from container to our host machine at port 8000.env_file: .env we want to load all environment variables values from .env file.command: npm run dev the command will run last after container sets up successfully. Remember this command will override CMD in our Dockerfile.volumes Do you remember that we’ll create a path name /usr/src/app in our Dockerfile? Now we want to bind that folder inside our container with our root project folder. The purpose is live-reload code inside container. If we don’t do that way, every time we change our code, we need to rebuild our image again.depends_on our node application cannot be used without database, so this command will notify docker-compose that, dev service depends on mysql service, and it’ll wait for mysql service start successfully before it ready for connection.image: mysql:5.7.24 this service is based on mysql image version 5.7.24.container_name name for this container.environment this is a list of environment variable values that image service need in setup process. If we don’t fill values for these variables here, docker-compose will look up inside .env file automatically as their document instruction.restart default is no it means that does not restart container in any circumstance. always here to make sure that our container is fresh every time we want to use.volumes we don’t want to lose all data whenever we restart or start new container related to this server, so we bind /var/lib/mysql inside container to db volume in our host machine.Now we just need one command to start every thing up
$ docker-compose up devThe docker-compose will build all service’s images in the first time and then start up all service’s containers. Now we can use our application as normal. You can make changes in our codes and it’ll work immediately without restarting our services.
Next, I’ll guide you how to set up for test environment. This is the premise that we can integrate with Continuous Integration (CI) service later.
We need to add a new Dockerfile name Dockerfile-test because we want to set up an image slightly different with development image.
FROM node:11.4.0
RUN mkdir -p /usr/src/app
WORKDIR /user/src/app
COPY package.json ./
RUN npm install
RUN npm install -g jest sequelize-cli
COPY . .
CMD ["npm", "run", "test"]
Everything is quite similar with Dockerfile except that we need to install jest and sequelize-cli globally in our test container. jest helps for run our tests, sequelize-cli helps for migration. The CMD is different too, we want to run npm run test latest.
Here is our script inside packge.json file for running test:
"scripts": {
    "migrate": "sequelize db:migrate",
    "migrate:test": "NODE_ENV=test npm run migrate",
    "pretest": "npm run migrate:test",
    "test": "jest --testPathPattern='./tests/.*\\.test\\.js$' --detectOpenHandles --runInBand --forceExit"
  },
Before we run test, we want to run migration first in pretest script to make sure that our database is up-to-date.
Our docker-compose now looks like this:
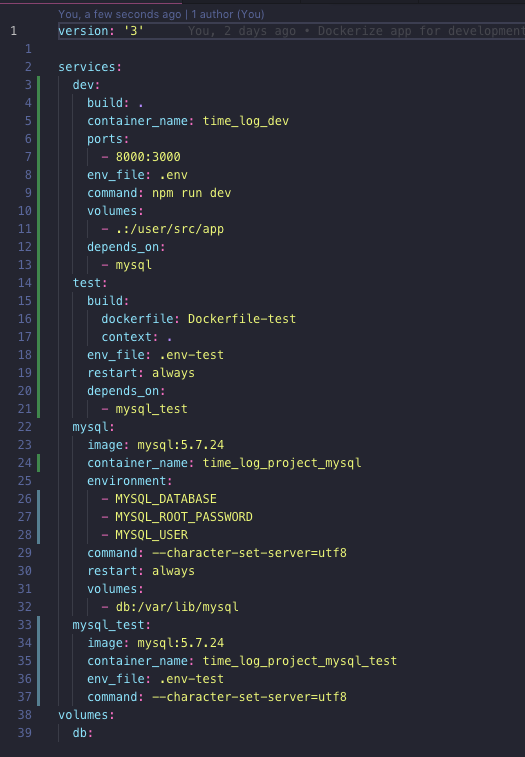
build we can specify which Dockerfile we want to use for our image, in this case is Dockerfile-test.env_file we want to load .env-test environment file instead of .env for test environment.depends_on for test environment we’ll depend on mysql_test service.It’s quite similar to mysql service except that different env_file and we don’t want to bind this database data to our host machine volume. We want to start a very new database every time we run test.
Now we can start services for running our tests:
$ docker-compose up testAt this moment we already have a real application project set up for work. I try to introduce and integrate almost everything we need for a real project, not an example or an exercise one. Hopefully, we’ll go further based on this project.
We still have many things can improve for this application that we can do it together one day:


